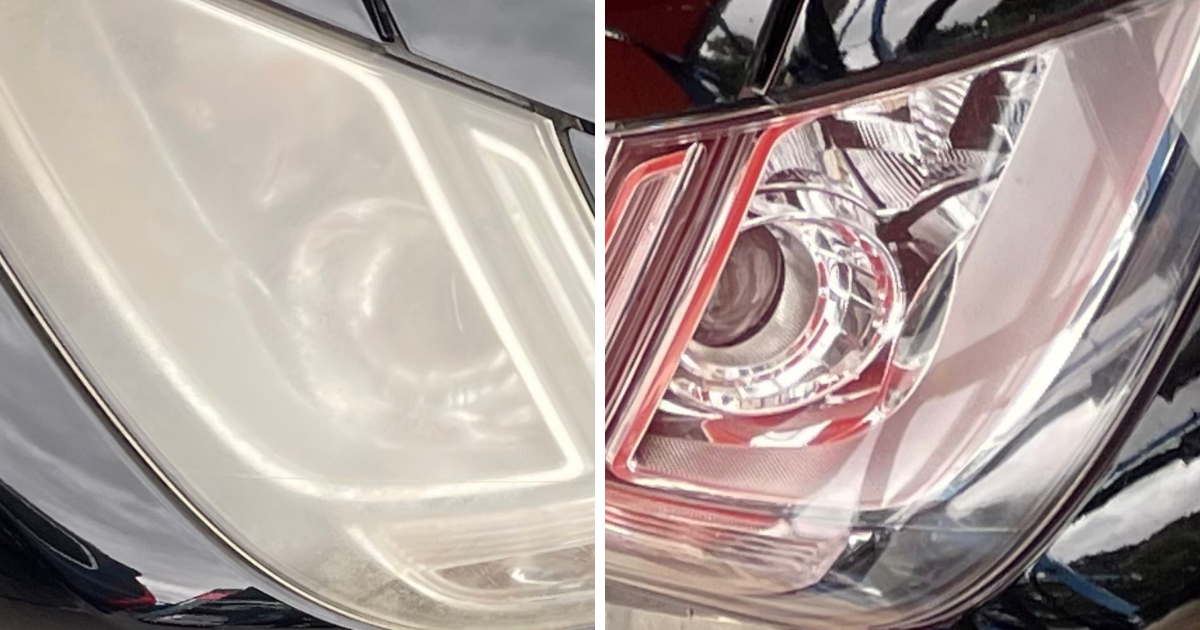
There are many benefits of headlights, making them a critical component of your vehicle. They improve visibility while on the road, which helps prevent accidents. The proper function and clarity of the headlight system are extremely important to maintain safe driving conditions. Therefore, ensuring you have well-functioning and clear headlights keeps you and other drivers safe on the road. You can learn how to clean headlight lens with the tips and tricks highlighted in this article.
Most headlight lenses are made of polycarbonate, which is a plastic material able to transmit light. Although this material is durable and shock-resistant, long-term sun exposure can lead to clouding as well as color changes. The UV rays can cause oxidation when they meet with the polycarbonate material on your headlights. In addition, dirt, debris, and weather conditions can also contribute to the deterioration in appearance.
There is a best way to do everything, so we will present you with the best way to clean headlight covers. There are two different methods covered in the article depending on the state of your headlights. Keep reading to discover how to clean headlight lens and avoid the cost of replacements.
Best way to clean headlight lenses with extreme yellowing
If you are faced with a headlight with years of damage, you may need to consider this method. It requires a restoration kit, gloves, masking tape, a microfiber towel, and some motivation. If you’re ready to get into it, here is how to clean yellow headlights at home with a restoration kit:


1. Clean the headlight with a mixture of soap and water to remove any dirt and debris.
You can use a microfiber towel to aid in the cleaning and drying process. If you are using dish soap, make sure to avoid any other surfaces of your car with paint.
The purpose of cleaning the headlight first is to provide a clear surface, so you can better assess what you are working with. Let your headlight air dry or dry with a microfiber towel before proceeding.
2. Apply masking tape on the surrounding areas.
The use of masking tape helps avoid getting substances on surfaces you’re not working with. It also helps you see the area that needs to be targeted.
3. Follow the directions on your restoration kit.
Most restoration kits use similar cleaning techniques. Although the cleaning method that is described in step 4 is based on the restoration kit suggested above, it should be similar to other kits. Nonetheless, follow the directions based on the restoration kit you have in your possession.
4. Use the surface activator.
If you are using the suggested restoration kit, you can use the surface activator. Ensure that the surface you’re working on is dry prior to applying the activator. Allow the activator to sit for approximately 30 seconds and rinse off with water.
5. Sand away.
Make sure the surface you’re working with is wet for this step. Your sandpaper should also be wet prior to use. Start with the 400-grit sandpaper (the smaller the grit number, the more abrasive). Work in a horizontal motion making sure to cover all surfaces. Apply water as needed during the sanding process to prevent drying.
Follow up with the 1000-grit sandpaper and repeat the same process as used above. Work in the horizontal direction and cover all surfaces for approximately five (5) minutes. After you’re done, use the 2000-grit sandpaper, but this time, work in the vertical direction for another 5 minutes. During each sanding process, make sure you’re adding enough water and covering all surfaces. Lastly, remove sanding dust and remnants with a microfiber towel.
6. Polish the headlights.
Apply the headlight polish with the use of a microfiber towel. You can use a polishing machine to get a good amount of pressure if desired. After polishing, rinse the headlight with water and wipe it dry.
7. Apply surface activator.
If using the kit suggested, apply the surface activator once again after allowing the headlights to dry from step 6. The surface activator should be left on for approximately 30 seconds before rinsing. Wipe the surface dry before moving on to the next step.
Follow the direction provided on your respective restoration kit for the best results.
8. Use protective UV coating.
Seal everything by applying a UV protective coat. You can use a paper towel or the cloth provided in your kit to apply the coat. Using gentle strokes, apply the coating in an ‘S’ pattern. Cover each surface of the headlight with one coating and allow it to dry.
__________________________________________
How to clean headlight lens with mild deterioration
Your headlight lens may have mild damage, in which case you may not need a restoration kit. You can take care of that with the use of a mild abrasive. If you have baking soda at home, that can do the trick. Another good cleanser is Bar Keepers Friend.


1. Follow steps 1 & 2 as directed in the previous method.
You should still clean your headlights to remove dirt that may have accumulated. Working with a clean surface helps you acquire the best results.
2. Wet and clean.
Prior to starting, test the cleanser on a small surface first. Wet the surface of your headlight and apply Bar Keepers friend. You can use a brush or a wet microfiber towel to gently clean your headlights to avoid scratching the surface. Keep Bar Keepers Friend on for no more than a minute and rinse off.
If using something less abrasive, you can use a buffing system, like the one recommended above.
3. Follow steps 6 & 8 as directed in the previous method.
You should polish and add a sealant to the headlights after proper cleaning. This ensures your headlights are protected from external elements.
Key points:
This article tells you how to clean headlight lens depending on the amount of damage. You can restore your headlight lenses using the two methods highlighted in this article.
The first method will be beneficial for headlights with more yellowing, while the second method will be helpful for light damage.
These methods can be extremely helpful, but if you don’t obtain the result described, you may need to consult a professional. In those instances, you might be dealing with interior damage or may need complete replacement.


Leave a Reply